Beats is the most popular Headphone brand in the United States (Statista), and both iPhone users and Android users (are Beats compatible with Android?) know how premium these Headphones are.
These Headphones are reliable until something starts to fail. If you ever had problems trying to pair up your Beats, then you are not alone.
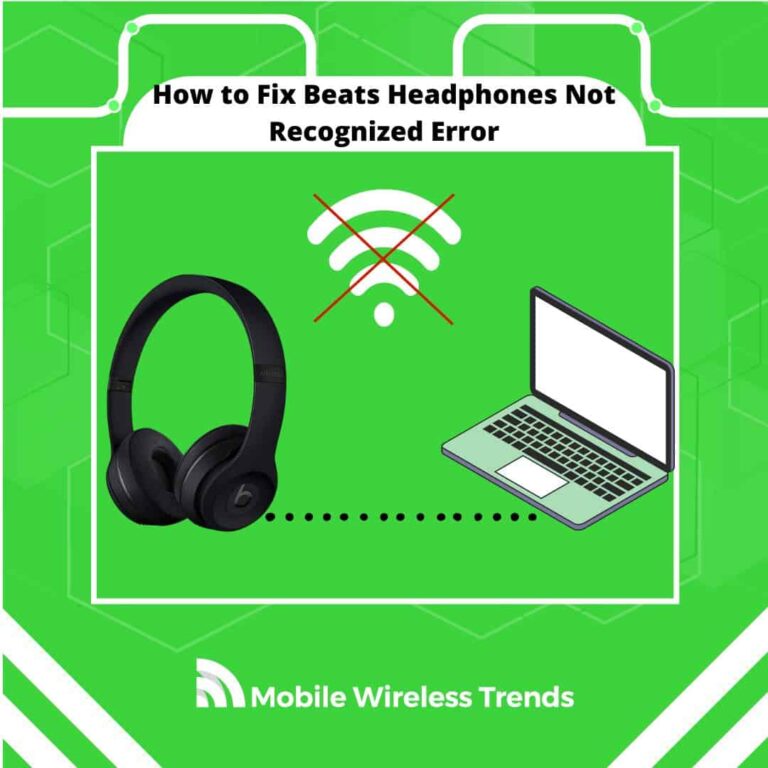
Let’s learn how to fix Beats Headphones not recognized error by following 7 proven fixes by Mobile Wireless Trends.
Quick Tech Answer
To address the issue of Beats Headphones not being recognized on a Windows computer, start by unpairing the device and pairing it again. Verify the volume and sound settings on both the Headphones and the computer. Check the physical location of the Headphones to ensure a stable connection. If the problem persists, attempt a force restart of the Headphones. Consider updating the Beats firmware and checking the battery level. If necessary, test the Headphones on an alternate device to isolate the problem.
Tech Shortcut
Why Won’t My Beats Headphone Connect to My Device?
Normally, Beats Headphones will smoothly connect to your device as long as you complete the pairing process.
However, if this doesn’t happen, then there are three main reasons behind the “Not recognized” error.
1. Bluetooth Pairing Issues
Bluetooth connectivity can sometimes be finicky. If your Beats Headphones haven’t been paired correctly with your device, they won’t connect.
Bluetooth connectivity on iOS devices and Android phones (newer models) normally works smoothly, so it is worth checking the pairing steps in order to fix the “Beats not recognized” problems once and for all.
2. Hardware-related Issues
Your wireless Headphones could face connectivity problems due to hardware-related issues.
This could involve a malfunction in the Bluetooth receiver or transmitter within the Headphones, which may prevent them from establishing a stable connection with your device.
It’s a good idea to inspect the physical condition of your Headphones for any visible damage and to ensure that all components are working as intended.
3. Outdated Firmware or Software Bugs
Firmware and software play a crucial role in the proper functioning of wireless Headphones. Outdated firmware can result in compatibility issues and connectivity problems.
Similarly, software bugs within either the Headphones or the device you’re trying to connect to can hinder the connection process.
Beats Headphones have their own firmware, and this firmware works alongside iOS, Android, MacOS, and Windows.
Therefore, keeping all devices updated is a great way to avoid recognition issues between Beats and your device.
Can You Fix Beats Headphones That Won’t Connect?
Yes, you can fix Beats Headphones that won’t connect, but the different fixes might vary depending on the type of error you are facing.
For instance, if we are talking about software-related problems, then fixing Beats Headphones Not Recognized will be easy.
In contrast, if you need to tackle hardware-related issues, then the solution will be a bit harder, but not impossible – read further to learn more.
How to Fix Beats Headphones Not Recognized Error: 7 Fixes
In order to fix Beats Headphone recognition errors, it is important to identify the root cause of the issue.
Then, follow these 7 ways to fix Beats Headphones Not Recognized to successfully use your Headphones right away.
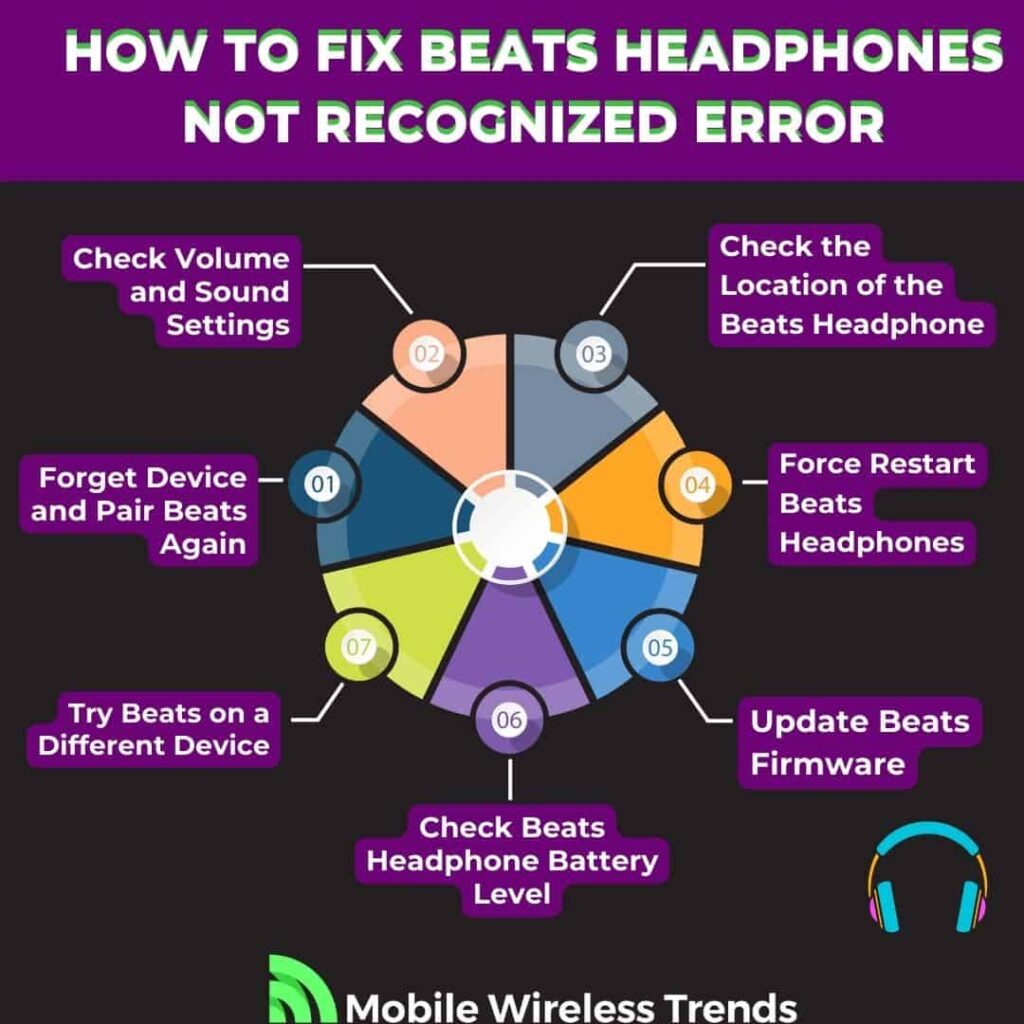
1. Forget Device and Pair Beats Again
If your Beats Headphones are not being recognized by your device, performing a device forgetting and re-pairing can often resolve the issue.
According to the official Apple website (let’s not forget that Beats are owned by Apple), these are the steps you need to follow:
To Re-pair Beats Headphones on iOS Devices:
- Disconnect your Beats Headphones from the iOS device.
- Open the iOS device’s “Settings” app.
- Scroll down and tap on “Bluetooth.”
- Locate your Beats Headphones in the list of paired devices and tap the “i” (information) icon next to their name.
- Tap on “Forget This Device” and confirm the action.
- Now, your Beats Headphones are disconnected from the iOS device.
To Re-pair Beats Headphones on Mac Computers:
- Disconnect your Beats Headphones from the Mac.
- Click on the Apple menu in the top-left corner of the screen.
- Select “System Preferences.”
- Click on “Bluetooth.”
- Find your Beats Headphones in the list of devices, click the “X” next to their name, and confirm to forget them.
To Re-pair Beats Headphones on Android Devices:
- Disconnect your Beats Headphones from the Android device.
- Open the Android device’s “Settings” app.
- Navigate to “Connected devices” or “Connections,” then select “Bluetooth.”
- Locate your Beats Headphones in the list of paired devices and tap on them.
- Select “Unpair” or “Forget.”
After you’ve successfully forgotten the device, follow these steps to pair your Beats Headphones again:
- Put your Beats Headphones in pairing mode (usually achieved by pressing and holding the power button until you see a flashing light).
- On your device (iOS, Mac, or Android), go to the Bluetooth settings and search for available devices.
- When your Beats Headphones appear in the list, tap on them to initiate the pairing process.
- Follow any on-screen prompts to complete the pairing, which may involve confirming a PIN or passkey.
- Once successfully paired, your device should now recognize and connect to your Beats Headphones – this simple trick works most of the time, so try it out.
2. Check Volume and Sound Settings
To ensure that your Beats Headphones are recognized and functioning properly, it’s essential to review the volume and sound settings on your device.
Perhaps the Headphones have already been recognized by your device, but you can’t listen to them because the sound settings are wrong. Do this:
To Check Sound Settings on iOS Devices:
- Unlock your iOS device and open the “Settings” app.
- Scroll down and tap on “Bluetooth.”
- Under the list of paired devices, locate your Beats Headphones and tap on them.
- Make sure that “Show Notifications” is enabled and that the Headphone’s battery level is displayed. This confirms that the device recognizes your Beats Headphones.
To Check Sound Settings on Mac Computers:
- Click on the Apple menu in the top-left corner of your screen.
- Select “System Preferences.”
- Click on “Sound.”
- Navigate to both the “Output” and “Input” tabs and ensure that your Beats product is selected as the preferred device. Adjust the volume sliders accordingly.
To Check Sound Settings on Windows Computers:
- Right-click on the speaker icon in the system tray.
- Select “Open Sound settings.”
- Under the “Output” section, locate your Beats Headphones in the list of devices.
- Choose your Beats product as the playback device. Adjust the volume slider as needed.
After checking the audio settings, put on your Headphones and see if they are being recognized by your device now. If not, move on to the following fix.
3. Check the Location of the Beats Headphone
The physical location of your Beats Headphones in relation to the connected device can impact connectivity and recognition.
Here are some tips to ensure optimal positioning in order to fix the Beats Headphone Not Recognized error:
1. Proximity to the Device: Keep your Beats Headphones within a reasonable range of the connected device. While Bluetooth has a typical range of around 30 feet (10 meters), keeping them closer can help maintain a strong and stable connection.
2. Avoid Interference: Minimize interference by avoiding areas with high wireless activity. Places with multiple Bluetooth devices or crowded Wi-Fi networks can create signal congestion.
Metallic surfaces, microwaves, and certain electronic devices can also interfere with Bluetooth signals. Keeping a clear line of sight between your Beats Headphones and the device can help mitigate these issues.
3. Electromagnetic Interference: Magnetic fields from electronic devices or appliances can affect Bluetooth connections. Keep your Beats Headphones away from sources of electromagnetic interference, such as speakers, power transformers, and large electronics.
4. Stay Within Range: Bluetooth signals weaken as you move farther from the connected device. If you experience dropouts or intermittent connectivity, stay within the recommended range to maintain a stable connection.
5. Signal Strength Indicators: Some devices display Bluetooth signal strength indicators. Use these indicators to gauge the strength of the connection. If the signal is weak, consider adjusting the positioning of your Beats Headphones.
6. Reset Bluetooth Connection: If you’ve adjusted the positioning of your Headphones and are still experiencing issues, you might want to disconnect and reconnect the Bluetooth connection. This can sometimes help reestablish a stronger connection.
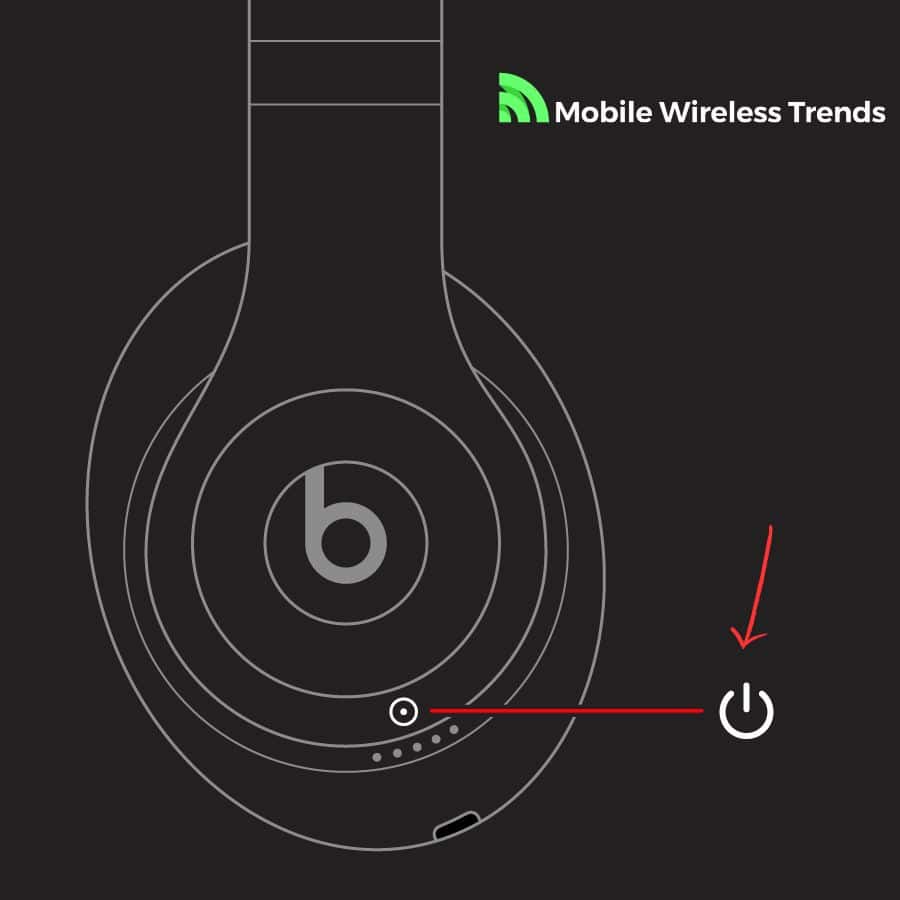
4. Force Restart Beats Headphones
If your Beats Headphones are experiencing recognition issues, a force restart can help reset the internal hardware and potentially resolve the problem.
Apple says that restarting your Beats Headphones is a great way to make your device recognize them easily, and this is how you can do it (based on different Beats models and versions):
Reset Studio3 Wireless:
- Press and hold the power button and volume down button together for approximately 10 seconds.
- Release the buttons when the Fuel Gauge flashes.
- Your Studio3 Wireless Headphones are now reset and can be reconfigured with your devices.
Reset Solo3 Wireless:
- Hold down the volume down button and the power button together for approximately 10 seconds.
- Release the buttons when the Fuel Gauge flashes.
- Your Solo3 Wireless Headphones are now reset and ready to be paired with your devices again.
Reset Solo Wireless:
- Switch off your headset.
- Hold down the multifunction button and volume down buttons simultaneously for about eight seconds.
- The red and blue indicator lights will alternate three times.
- Your Solo Wireless Headphones are now reset and can be reconnected to your devices.
Reset Solo Pro:
- Hold down the mode button and volume down button simultaneously for about 10 seconds.
- When the LED on your Solo Pro Headphones flashes red, release the buttons.
- Your Headphones are now reset and can be set up with your devices again.
Reset Beats Studio Pro, Studio, or Studio Wireless:
- Press and hold the power button for 10 seconds.
- Release the power button.
- All of the Fuel Gauge LEDs will blink white, followed by one LED blinking red. This sequence occurs three times.
- Once the lights stop flashing, your Headphones are reset. They will automatically power on after a successful reset.
Reset Solo2 Wireless:
- Ensure your Headphones are not connected to the USB charging cable.
- Press and hold the power button for 10 seconds.
- Release the power button.
- All of the Fuel Gauge LEDs will blink white, followed by one LED blinking red. This sequence occurs three times.
- Once the lights stop flashing, your Headphones are successfully reset.
Performing a force restart can effectively address hardware-related issues that might be causing recognition problems, so try this fix before moving onto the following solutions.
5. Update Beats Firmware
Updating your Beats firmware can address compatibility issues and enhance performance. If your device can’t recognize Beats Headphones, then the Headphones might need a quick firmware update.
To Update Beats Using an iPhone or iPad:
- Open the “Settings” app on your iPhone or iPad.
- Navigate to “Bluetooth” and tap the “i” (info) button next to your Beats device’s name.
- Scroll down to the “About” section to find the current firmware version of your Beats.
- If an update is available, follow on-screen instructions to update the firmware.
To Update Beats Using a Mac:
- Ensure your Mac is running the latest version of macOS.
- Press and hold the “Option” key and click the Apple menu at the top-left corner of the screen.
- Choose “System Information.”
- Click on “Bluetooth” and find your Beats device in the list.
- Check the firmware version. If an update is available, consider following the manufacturer’s instructions to proceed.
To Update Beats Using an Android Device:
- If your Beats Headphones are paired with an Android device, download the “Beats” app from the Google Play Store.
- Connect your Android device to a power outlet for a stable update process.
- Open the “Beats” app and follow the prompts to check for available firmware updates.
- If updates are available, the app will guide you through the update process.
Firmware updates ensure that your Beats Headphones are equipped with the latest features, improvements, and compatibility enhancements, which will help you fix Beats Headphones not recognized errors.
6. Check Beats Headphone Battery Level & Hardware
Examining both the battery level and hardware condition of your Beats Headphones is crucial for troubleshooting recognition issues.
Follow these steps to ensure optimal performance:
Battery Level Check:
- Turn on your Beats Headphones and listen for any low-battery alerts, beeps, or indicators. Some Headphones might audibly notify you when the battery is low.
- On iOS devices, you can also check the battery level by going to Settings > Bluetooth, and tapping the “i” (info) button next to your Beats.
- Regularly charge your Headphones using the original charging cable and adapter. Using third-party or incompatible chargers might affect battery performance and damage your Headphones.
Hardware Inspection:
- Examine your Beats Headphones for visible signs of damage, wear, or loose components. Check the headband, ear cups, and cables for any issues.
- Ensure that buttons, switches, and ports are functioning properly. Malfunctioning buttons might impact connectivity and recognition.
- Clean the Headphone’s connectors and charging port, as dirt or debris can interfere with charging and connectivity.
Charging Considerations:
- Always use the original charging cable and adapter provided by Beats. Substituting with different chargers might not provide the correct power output, affecting battery health.
- Charge your Headphones in a dry and safe environment, away from extreme temperatures, liquids, and excessive humidity.
- If you notice any unusual behavior while charging, such as overheating or slow charging, disconnect the Headphones immediately and contact support, as this is not normal behavior for these Headphones.
7. Try Beats on a Different Device
When facing recognition issues with your Beats Headphones, testing them on another device can help determine whether the problem lies with the Headphones or the original device.
In this case, this is what you have to do:
1. Prepare a Different Device: Use another smartphone, tablet, computer, or any compatible device as a testing platform.
2. Reset Beats Headphones: Before connecting to the new device, perform a reset of your Beats Headphones following the manufacturer’s instructions. This ensures a clean slate for troubleshooting.
3. Pair with New Device: Put your Beats Headphones in pairing mode, as described in the user manual. On the new device, access its Bluetooth settings and scan for available devices. Locate your Beats Headphones in the list and pair them with the new device.
4. Test Connectivity: Play audio or media on the new device to verify if the Beats Headphones are recognized and functioning correctly. Check for any audio dropouts, interruptions, or connectivity issues.
5. Observe Recognition: Observe if the new device easily recognizes and maintains a connection with the Beats Headphones.
If the Headphones are recognized without any problems on the new device, it suggests that the original device might be causing the recognition issue.
To summarize, if the Beats Headphones work flawlessly on the new device but not on the original one, consider re-pairing or troubleshooting Bluetooth settings on the original device.
The problem can be slightly more complex, so keep reading to learn what to do in this case.
My Beats Headphones Are Still Not Recognized, What Do I Do?
In the unfortunate event that you tried it ALL and nothing worked, then there are three last-resort alternatives you can follow to fix Beats Headphones Not Recognized errors.
1. Check Your Beats Headphone Hardware
Are you sure that the hardware of your Beats Headphone is working as it should? Try the following tips before moving on to the next part of the article:
1. Visual Inspection: Examine the exterior of your Beats Headphones for any visible signs of physical damage, such as cracks, dents, or scratches. Pay close attention to the headband, ear cups, and hinges.
2. Check for Fabric Errors: If your Beats Headphones have fabric-covered parts, ensure that the fabric is intact and securely attached. Any loose threads or detached sections can impact the overall durability and aesthetics.
3. Buttons and Controls: Test the functionality of buttons, switches, and controls. Make sure they respond appropriately and are not sticking or behaving erratically.
If the hardware of your Headphones is indeed damaged, then jump on to the third fix on this list.
2. Update Your Android, iOS, Windows, or Mac Operating System
Keeping your device’s operating system up to date is essential for maintaining compatibility with various accessories, including your Beats Headphones.
Follow these steps to update your operating system and potentially resolve Beats Headphones recognition issues:
To Update Android Devices:
- Open the “Settings” app on your Android device.
- Scroll down and tap on “System” or “Software Update,” depending on your device’s interface.
- Select “Software Update” and follow the prompts to check for available updates.
- If updates are available, download and install them.
To Update iOS Devices:
- Open the “Settings” app on your iOS device.
- Tap on “General,” then select “Software Update.”
- If an update is available, follow the instructions to download and install it.
To Update Windows Computers:
- On a Windows computer, click the “Start” button and open “Settings.”
- Select “Update & Security” and click on “Windows Update.”
- Click “Check for updates” and follow the prompts to download and install any available updates.
To Update Mac Computers:
- Click the Apple menu at the top-left corner of your Mac screen.
- Choose “System Preferences,” then select “Software Update.”
- If updates are available, follow the instructions to download and install them.
Restart Your Device:
After installing updates, restart your device to ensure that the changes take effect. Then, attempt to recognize the Beats Headphones with your device and see if it works.
3. Contact Beats Support and Schedule a Repair
Finally, if you tried it all, and nothing seems to work, sorry to break the bad news to you, but your Headphones are damaged!
In this case, you need to schedule an Apple Repair. To do so, follow these steps:
1. Schedule a Visit or Send in for Repair: Make an appointment at an Apple Authorized Service Provider or Apple Store for in-person service. Alternatively, you can arrange to mail your Beats product directly to Apple for repair.
2. Contact Apple Support: If you have questions or need guidance, you can contact Apple Support and talk to an Apple Support Advisor.
3. Damaged Beats: If your Beats product has physical damage, you can replace each damaged item for a fee. Note that accidental damage isn’t covered by the Apple warranty. Accidental damage may be eligible for coverage under your AppleCare+ for Headphones plan.
4. Battery Service: If your Beats Headphones or earphones need a new battery, Apple can replace it for a fee. Normal battery wear from regular use isn’t covered by the warranty. If you have AppleCare+ for Headphones and your battery holds less than 80% of its original capacity, you may be eligible for a free battery replacement.
5. Cost Estimates: And this is where things get a bit difficult. Use the “Get an Estimate” tool provided by Apple on the aforementioned website to review potential costs if you get service directly from them.
You will get an estimate, but as you can see here, it’s pretty expensive ($199):
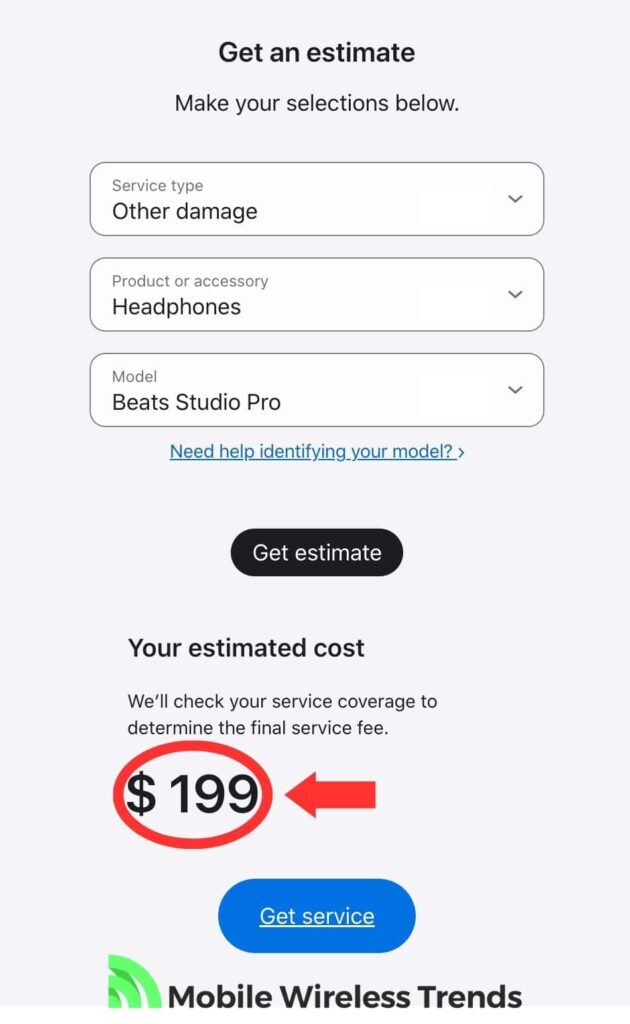
If we consider that this model of Beats costs $350 on the official Apple website, it is still cheaper to get them repaired than to buy a new pair of Headphones.
At the end of the day, it’s up to you and your budget!
Tech Recap: Beats Headphones Not Recognized on iPhone, Android or Computer
Beats Headphones are pretty expensive, but they are also very, very premium.
That’s why we want these Headphones to work at all times, and thanks to Mobile Wireless Trends’ guidance, you are ready to solve all recognition errors within your devices.
These are the best 7 ways to fix Beats Headphones Not Recognized errors:
- 1. Forget Device and Pair Beats Again
- 2. Check Volume and Sound Settings
- 3. Check the Location of the Beats Headphone
- 4. Force Restart Beats Headphones
- 5. Update Beats Firmware
- 6. Check Beats Headphone Battery Level
- 7. Try Beats on a Different Device
Techies Also Ask
Can I Force My Beats Headphones To Reset?
Yes, you can force a reset on your Beats Headphones. Depending on the model, the reset process might involve holding specific buttons or switches for a certain duration. Refer to your Headphones’ manual for instructions on how to perform a reset, or follow the instructions we gave you above.
Why Is My Windows Computer Not Recognizing Beats Headphones?
Your Windows computer might not be recognizing your Beats Headphones due to several reasons.
It could be due to outdated or incompatible audio drivers, issues with the USB or Bluetooth connections, or settings conflicts.
Check if your drivers are up to date, ensure proper connection, and review your computer’s sound settings to troubleshoot the recognition problem.